Rename Files in Dropbox
In today’s world of wireless technology and remote storage, we all have a cloud storage account by one of the major companies like Microsoft, Google, Dropbox, Amazon, etc. Whether the data you store is personal documents and pictures or data for commercial use, the need to rename files does arise. Renaming a file or two isn’t much work, but imagine renaming all the photos from your vacation or numbering hundreds of documents you need for a project. It’s going to be a cumbersome task.
Cloud File Renamer (CFR) is a handy tool to help you out if you need to rename multiple files in your cloud drives. Let’s take a look at how you can rename files in Dropbox.
Rename Dropbox Files Using Cloud File Renamer
Renaming files on your Dropbox account is a very easy process.
Here are the 5 steps to do that.
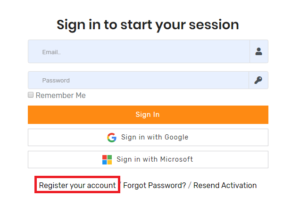
Create an Account or Log in
To use the application, you need to have an account on the CFR web-service. Follow these simple steps to create an account or log in to start using the app.
- Go to
https://www.cloudfilerenamer.com.
- If you already have an account, type your email and password in the given fields on the sign-in page. You can also login using your Google or Microsoft account. Logging in with Google or Microsoft is one of the easiest methods. Simply click the button of the platform you wish to sign in with, and you will be redirected to their Login page.
- If you don’t have an account, click on Register your account to create a new account. You will be redirected to the Sign-up page.
Create a new CFR account
- Type in your First name, Last name, and Email.
- Read and accept the Terms and Conditions, enter the captcha value and proceed.
- You will receive a confirmation email. Use the link in the confirmation email to log in to your account and set your CFR account password.
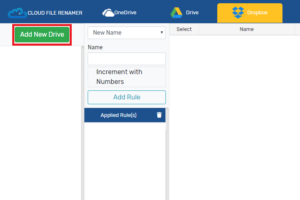
Add Your Dropbox
Once you are logged into the application, select the cloud storage service where your files are stored.
- Click the Dropbox tab in the top navigation bar and then click the Add New Drive button in the left Section to add your Dropbox account to Cloud File Renamer.
Adding your Dropbox
- You will now be redirected to a Dropbox login API. This is a secure method and is an industry-standard. Use your Dropbox credentials to Sign in to your Dropbox account and give limited access to Cloud File Renamer. You will be redirected to the application on successful authentication.
- Once you have granted access to Dropbox, you will see your folders in the left Column under the Add New Drive button. This means that you have successfully added your Dropbox to CFR.
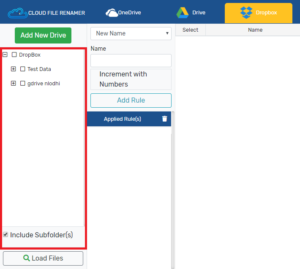
Load the Files You Want to Rename
After adding your Dropbox you need to load the files you want to rename. Follow these simple steps to do so:
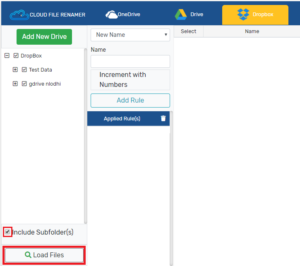
- Select the folders you want to load from the left Column by marking the checkboxes next to the name of the folder.
- Mark the Include Subfolder(s) checkbox if you want to include all files and folders inside the folder(s) you have selected.
- Click the Load Files button to load these files to Cloud File Renamer.
Loading the files to be renamed
- The selected files will now be displayed on the right area of the web-app, showing a detailed view of each file including its name.
Apply Renaming Rules
There are multiple ways you can rename your files in CFR using renaming rules. Add rules and apply them to your files. Let’s take a look at how these rules work.
The renaming rules reside in the panel between the Load Files column and the Files Preview section. Use this panel to add and apply rules to your data.
The dropdown menu opens to show the list of all the renaming rules. Select the rule you want to apply and relevant options will show up above the Add Rule button. After filling the fields related to the rule (like the Name field for the New Name rule), click the Add Rule button to add the rule to the Applied Rules panel. Let’s take a look at what each Rule does.
New Name
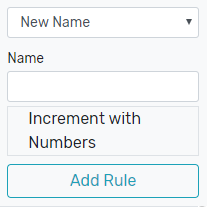
This rule applies a new name to all the selected files. Type the name you wish to rename the files to in the Name text field. The files will be renamed and will increment with numbers.
Replace Text
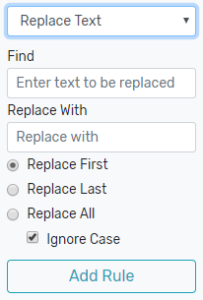
This rule replaces certain text in your file’s name with text of your choice. Type the text you want to be replaced in the Find textbox and the text you want to replace it with, in the Replace With textbox. Choose whether you want to replace all instances of the text or just the first or last instance. Mark the checkbox to disable case-sensitivity.
Remove Text
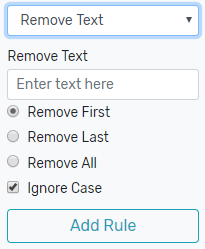
This rule allows you to remove text from your filenames that you don’t need. Type in the text you want to remove and select whether you want to remove all instances of it or just the first or last. Check the box to ignore the case.
Trim Text
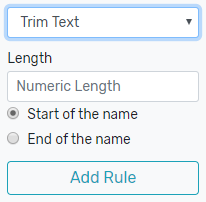
Use this rule to trim text from the start or the end of the name. Enter the number of characters you want to trim and choose whether you want to trim it from the start or the end of the filename.
Numbering
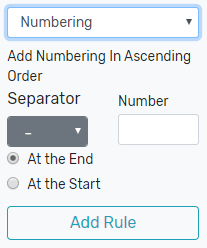
This rule comes in handy when you need to add numbers to your Dropbox files. You can choose the separator to display in between the number and text. The options to choose from are – (hyphen) and _ (underscore). Input the number you want the numbering to start from in the ascending order. You can also select whether to add the numbering before or after the filename.
Insert At
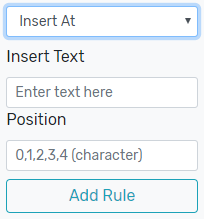
This rule helps to add text at any position in the filename. Simply enter the text you want to add and enter the position you want to add it to. The position is the character in the filename. 0 being the first, 1 being the second and so on.
Swap
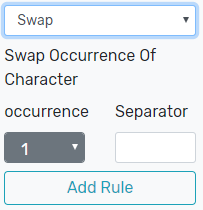
The swap rule is an interesting one. It looks for the specified number of occurrences of the separator you enter (a comma in this case ) and swaps the text on each side of the separator. E.g. Adam, Brown becomes Brown, Adam.
Suffix

Add text at the end of the filename using this rule. Enter the text you want to enter at the end of the filename in the Suffix textbox.
Prefix
This rule works the same way as the Suffix rule except it adds the text before the filename.
Lower Case, Upper Case, and Title Case
These rules convert all filenames in Dropbox cloud to lowercase, UPPERCASE, and Title Case respectively.
Hit the Rename Button
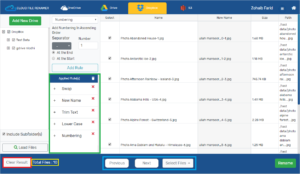
Once you have applied all the rules you want, they will show up in the Applied Rules pane (marked in green).
Now that you are all set to rename your files, look at the bottom navigation bar before you do so. The bottom navigation bar has a Clear Result button (marked in red) that clears the right preview pane. It also houses the page navigation and the option to Select All or Unselect All (marked in blue). The total file count sits beside the Clear Result button and shows the total number of files loaded in the right column (marked in yellow).
Finally, in the bottom-right corner is the Rename button. When you are sure you have all the rules correctly added and all the required files are selected, hit the rename button. Voila! Your Dropbox files are renamed in a matter of minutes.