Rename Google Drive Video Files
Google Drive is a cloud service that allows its users to store and synchronize data, which can be accessed from anywhere. Not only does it eliminate the need for external storage but it keeps your data protected as well. Google Drive enables its users to store documents, photos, music, and video files.
Because smartphones and tablets automatically synchronize data to Google Drive, it is imperative that the data is kept organized and well managed. Cloud File Renamer in that respect helps organize data by renaming files that otherwise create a lot of confusion due to the random way they are named. Let’s see how Cloud File Renamer can be used to rename video files stored on Google Drive.
Cloud File Renamer
Cloud File Renamer is a web-app that allows users to rename a file stored on any of the supported cloud drives. It is an efficient renaming tool that uses 256-bit encryption to keep your private information secured. Accessing user data only through the official APIs of cloud drives means Cloud File Renamer works in a totally transparent manner at all stages.
It stands out from the rest due to the unique renaming rules that are as easy to apply, as the application is to use itself. Even though Cloud file Renamer is swift in performing the rename operation, the time required to scan the files and rename them depends on the amount of data stored on the cloud drive.
Step 1: Launch Cloud File Renamer
Visit the Cloud File Renamer website and register for an account. You can choose between Signup with Google, Signup with Microsoft, and Create an Account to register for your account.
Now enter your login credentials and sign in to CFR.
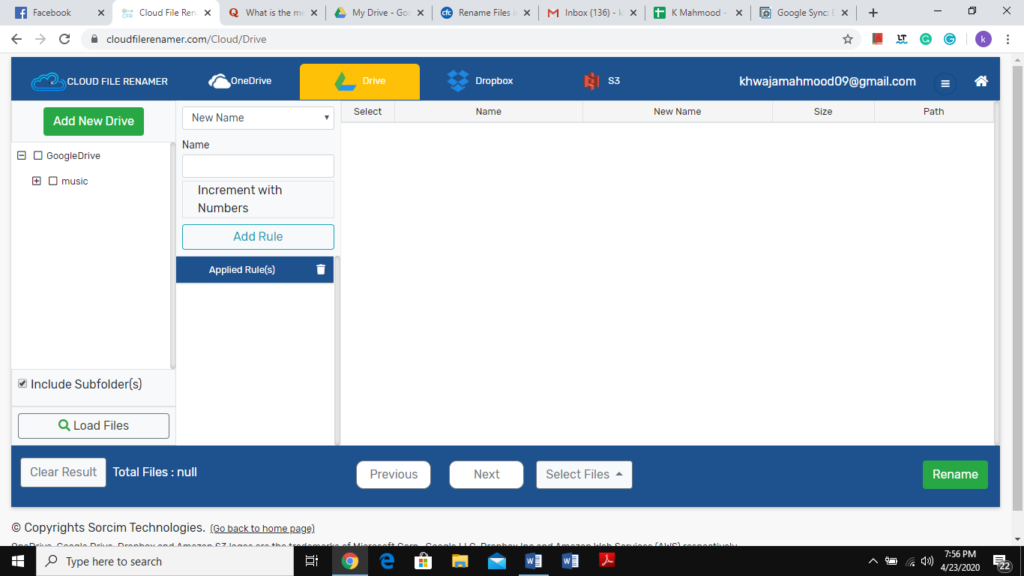
Step 2: Load Google Drive
After you have logged-In, it is time to load Google Drive. Click the Drive tab on the app page. Now click the Add New Drive button and enter your Google account credentials. Cloud File Renamer will process your Google Drive data and list out all the folders in no time.
Step 3: Select Folders
Now you have to select folders that contain data you want to rename. If you want to select the entire Google Drive data, simply select the checkbox for Google Drive right below the Add New Drive button. Alternatively, you can select individual folders as well via marking their checkboxes.
Note: Data that is located inside folders will be renamed only. Any data that is located outside folders on the home location of Google Drive won’t be renamed.
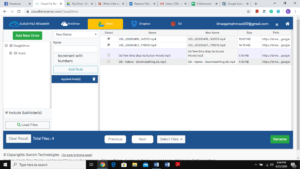
Step 4: Load Files
After you are done selecting the folders, click Load Files at the bottom to enable Cloud File Renamer to load files from those folders.

Files loaded
Step 5: Select Files
In a matter of seconds, Cloud File Renamer will upload all the files (including video files) stored in the folders you just selected. Furthermore, it pre-selects all the files, however, you can unselect the files you do not wish to rename.
Files selected
Step 6: Select the Rules
Now we get to the real action. Select the New Name drop-down menu to get the list of all the renaming rules that are available. Simply select the rule of your choice, select the relevant settings, type the required text (applicable in some cases) and click the Add Rule button. This way you can add multiple rules and multiple instances of the same rule in a single renaming go.
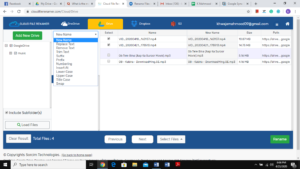
Selecting the renaming rules
If you want to check the preview of what the video files will look post-renaming, take a look at the New Name column.
Step 7: Rename them
The last step is to click the green Rename button in the bottom-right of the screen and witness Cloud File Renamer do the magic.