How to Rename PhotoStick Photos?
The PhotoStick is a Pen Drive that is used to store and back up your photos with just a click of a button. Available in different storage sizes including 32 GB, 64 GB, 128 GB and 1TB, the PhotoStick can be connected to your PC easily via the USB port.
Product Spotlight: Use Sorcim’s Easy Files Renamer to rename PhotoStick photos in your computer.
EFR follows Google Software Principles. It will not ask you to provide email address to download the software.
Just like any other USB device, it can also be used to backup other files such as documents, music, videos and so on. Sometimes users end up uploading photos or files with the same title, which may make it difficult for you to locate the original file. Therefore, you will need to rename them so that you do not end up with duplicate files every now and then.
Why do I need a PhotoStick?
As secure as our smartphones and PCs are, there is always a chance of them breaking down. So you must always have a backup plan just in case things go South. This is where the PhotoStick comes in. It is a tool that creates a safe, and ever available backup of your data.
Another great advantage of using the PhotoStick is to free up memory space. You can connect it with your phone or PC, backup your data and free up some memory. This way you will not be worried about your data going anywhere.
Why do I need to rename PhotoStick Photos?
Renaming PhotoStick photos becomes necessary if you have photos with the same title. Windows adds a prefix to such photos which might become confusing for you. Another big advantage of renaming photos is to add more context to the photo. A photo named Image 101 tells nothing about the actual photo, but Mary’s First Anniversary Image 101 speaks a lot! Similarly, you can also add the date/ time taken to the photo. There are just about endless possibilities.
Move the Photos to the PhotoStick
PhotoStick comes with in-built software that automatically detects all the photos on your PC and backs them up very fast. As soon as you plug-in the PhotoStick, a new window will pop-up and launch the installation wizard. The installation will be over soon and open up the back software. Click Go in the bottom-right corner for the software to start scanning for photos.
Use Easy File Renamer
Visit the official website to download the Easy File Renamer setup file and install it.
Launch the program when the installation is over.
Step 1
Click the Add Files button under the Files sub-tab of System Renamer, select all the files from the PhotoStick device and click Open.
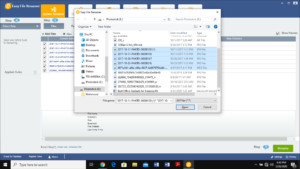
Adding the files to Easy File Renamer
Step 2
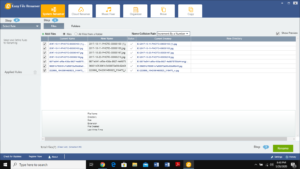
The files will be added soon and now you can select a renaming rule of your choice from the 12 rules that are available. You can even use multiple rules in a single renaming run.
Depending on the rule you have selected, you will have to type text and/ or choose an option of your choice.
Step 3
Click the Add Rule button to finalize the rule(s) for application with the settings you have selected. You can take a look at the New Name column to get a preview of the new names.
You can even click the red cross in front of a rule in the Applied Rules section if you want to make any changes to the way that rule is applied.
Step 4
Click the Rename button in the bottom-right corner to rename the photos. The rename operation will be over pretty soon and once it is done, your PhotoStick photos will have been renamed the way you wanted them to.